This Is The Absolute Best Way To Cook Sweet Potato (And It’s Very Simple)

Every home cook thinks they’re the best home cook there is – and you know what? They’re right. Including me. I am the best home cook.

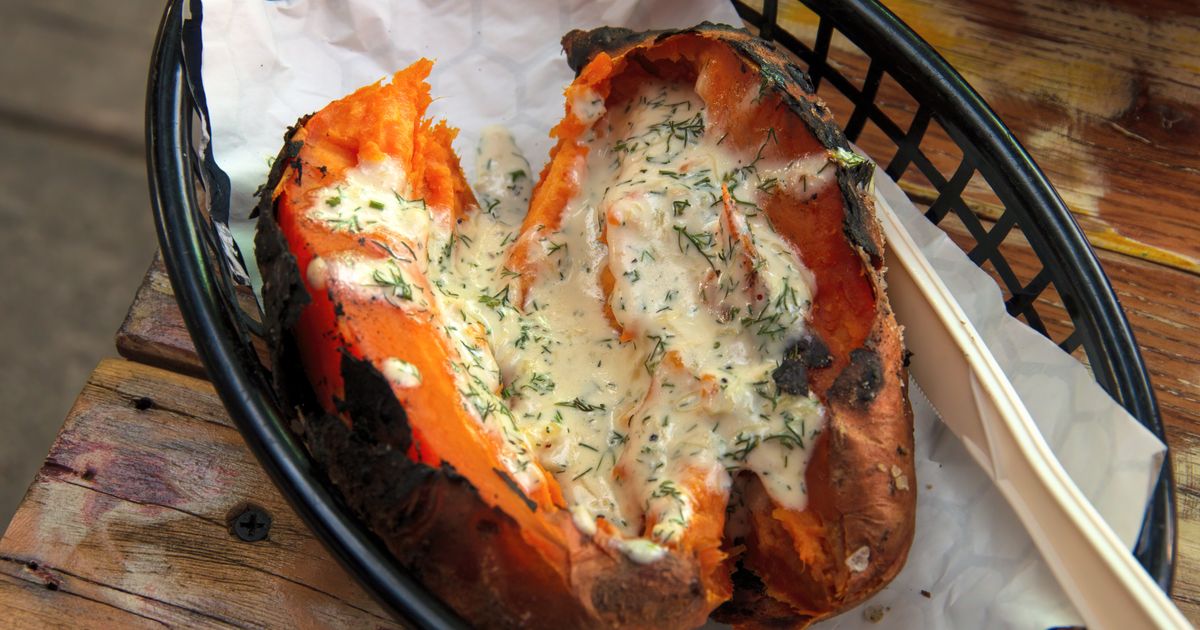
My most-perfected dishes are my weekly lemon and ginger chicken thighs and, without a doubt, my baked sweet potatoes.

Before I could even cook – well, before I binge-watched cooking channels for inspiration – I could always cook a mean baked sweet potato.

They’re really high in potassium and are versatile enough that they can be loaded up with chicken, tuna, cheese or honestly just a blob of butter, and still taste delicious.

The best, easiest way to cook sweet potatoes

First of all, heat your oven to around 190°C.

Next, give your sweet potatoes a good scrub and dry them with paper towels. This ensures that the oil soaks in a little easier later.

Now, you just need to prick a few holes in them using a fork and put them in the microwave for around five minutes.

Once they’re out, rest them on tin foil, pour a little vegetable oil on them as well as some mixed herbs (or whatever herbs and spices you’d like), rub the oil and seasonings into the skin and wrap them in the foil.

You should then put your sweet potatoes in the oven for around 30 minutes before checking to see if they’re soft enough using a fork. Sometimes, if they’re a little bigger, this can take up to an hour.

If yours still isn’t soft enough, check it every 10 minutes to see if they’re ready.

Finally, add your toppings and tuck in!

What about leftovers?

If you’ve made too many sweet potatoes, you could blend them with vegetable stock and make a little soup for later.

Health benefits of sweet potatoes

According to BBC Good Food, the health benefits of sweet potatoes include:

  • May reduce the risk of cancer
  • May support digestive health
  • May help manage type-2 diabetes
  • Good for eye health
  • May support immune function
  • May support the brain and nervous system
  • May support heart health
  • May be liver protective.

Long live the sweet spud!

Share Button

I Cook This Simple Chicken Thigh Recipe Every Week And I’m Still Obsessed

I like to think of myself as a foodie, a home cook, a kitchen whizz if you will but, in the middle of the week when I’m tired and rushed off my feet, I’m more of a kitchen… wimp.

I just want to have a delicious, nutritious meal with almost 0 effort on my part and minimal cleanup, if possible. Is that really too much to ask?

Well, I thought it was until I stumbled upon this chicken thigh recipe one desperate night when I didn’t know what I wanted but I did know I needed to use up the chicken in the fridge and I’d had a hankering for honey for a while.

Listen, if nothing else, I always know I’ll be eating this through the week.

The chicken thigh recipe that saved my sanity

I came up with this myself so, for the most part, measure with your heart. Maybe measure a little with your heart health, too, let’s not go too hard on the sodium.

The ingredients I use are:

  • Soy sauce
  • Honey
  • Ginger
  • Lemon

I personally am intolerant to garlic but if you are blessed with garlic tolerance, I recommend throwing some in there, too.

First, grab yourself a bowl. Into that bowl, you should grate a nub of ginger, squeeze in some lemon juice, add a little honey and soy sauce. Mix all of these together before adding just a tiny bit of the oil of your choice.

Then, spread this mixture over your chicken thighs.

You can cook them straight away or leave them to marinade throughout the day (which is what I do).

To cook them, either use the air fryer at 190° for 20 minutes, turning halfway through or in the oven for 30 minutes or until juices run clear at 200°.

I usually serve them with basmati rice and some steamed broccoli and spinach with a little sesame oil.

Finally, if you have a little lemon juice and ginger left over, boil the kettle, add them to a mug with some honey and have a lovely, soothing drink while you wait for your culinary masterpiece to cook.

Share Button

Mary Berry’s Unexpected Secret Ingredient For Delicious Turkey Skin

With Christmas day being only days away, it’s almost time to start prepping the turkey. It’s not often the most pleasant of activities, what with the uh, giblets removal and all but with the right preparation comes the most succulent of Christmas meats.

This year, we’re looking to none other than the queen of the kitchen herself, Mary Berry, for our turkey recipe. After all, who better to help us cook up a storm and impress our family with our kitchen tricks?

Of course, by this point we all have our own traditions for cooking the Christmas turkey but this year, we’ll be adding a little of Mary Berry’s finishing touches to the skin with orange slices.

The perfect finishing touch to roast turkey

So, in Mary Berry’s turkey crown recipe as featured on Mary Berry’s Absolute Christmas Favourites, she has two oranges ― one cut into slices and one cut in half and these add finishing touches to the cooking of the turkey.

So, once you’ve done your own preparations, loosen the skin on the turkey using your fingers or a spatula, gently so as not to tear anything. Then, mix two teaspoons of thyme leaves with 50g of softened butter and smear the mixture underneath the skin of the bird.

Then, arrange orange slices in two neat rows, under the skin and on top of the herb butter.

As for those orange halves? Place one under the skin at the neck end of the bird and any orange trimmings in the cavity.

This mix of citrus and herbs gives a perfectly Christmas flavour to the tastebuds and with not-too-much effort.

Plus, if you have any leftovers, these can be frozen for up to a month. Just make sure you wrap them up well!

Share Button

Mary Berry’s Unexpected Secret Ingredient For Crispy Roast Potatoes And Parsnips

It takes a lot for me to change my tried-and-tested roast parsnip recipe, but if there’s anyone who can convince me to alter my beloved roaster routine, it’s Mary Berry.

Writing for Love to Cook, the author and cooking guru shared that “Crunchy sweet parsnips are the perfect side dish. The addition of semolina gives them a lovely crispy outside.”

The trick works for spuds, too, she says ― “With the addition of semolina, these golden parsnips become extra crisp in the oven. Throw some in with your roast potatoes for something a bit different this Sunday.”

So, we thought we’d share why it works, as well as some other root veg-roasting tips:

Semolina has a moisture content of around 14%, which is why you need to hydrate it with milk or another liquid to access its fluffy deliciousness.

Meanwhile, spuds sit between 75% and 85% moisture. Parsnips are 80% water. That means that both veg tend to steam a little as they bake, providing the softer, fluffier texture we love on the inside of our roasters.

So, when you coat either option in small, dry semolina, the cereal stays dry and crispy when you bake them while the insides of the veg grow fluffy.

And because the grain is so fine and small, it clings easily to the outside of your roasted roots.

Yep! Mary Berry recommends cutting your parsnips into eighths rather than quarters for that extra-crisp finish, as you’ll have a larger surface area (and corners) for the oil to cover.

For both parsnips and potatoes, the semolina trick takes a similar pattern. Par-boil the veg (par-boiling should take four minutes for parsnips and up to ten minutes for spuds).

Cool them a little before placing some oil in a baking tray to get hot when you’re ready to prep the veggies for roasting.

Then, coat the parboiled veg salt, pepper, and a little oil before adding semolina and your herbs of choice. Cook until golden and deliciously, perfectly crisp.

Share Button

I’m A Chef — This Simple Recipe Will Level Up Your Carrots On Christmas Day

We all know that we’re going to spend Christmas day fighting over roast potatoes with our families and that the meat of choice comes after deep consideration but according to one chef, we’re actually missing a trick when it comes to our carrots.

Yes, that’s right, our collective disregard of the humble carrot has led us astray and we’ve been taking their essential spot on our dinner plates for granted, especially around this time of year.

Outrageous, really, since carrots are the ideal snack for reindeers.

Michael Lawson, head chef at Atlantic Brasserie said: “Carrots are great produce to cook with; they’re available year round and are super versatile.

“For Christmas dinner there are countless ways to elevate this humble veggie into the star of the show.”

How to elevate your Christmas carrots

Lawson promises that this recipe can “transform carrots into a stunning holiday centrepiece, that’s as delicious as it is eye-catching.”

All you need is honey, butter, pistachios, orange zest and, if you’re feeling extra fancy — chives.

Lawson says: “I start with glazing carrots with honey and butter, which gives them a rich and sticky finish.

“My secret ingredient is pistachios – they might not be the first garnish you think of when you’re cooking carrots, but they give the dish a nice crunch and a contrasting savoury flavour which is just mouthwatering. You can also add in some chives for colour and a more complex flavour”

Once you’ve done this, roast your carrots in olive oil for 45 minutes until fully cooked. Then, Lawson advises: “Make a glaze with the zest of an orange and around 20 ml of honey, cover the carrots in this and roast for a further ten minutes.

“Sprinkle the pistachios and chopped chives before serving. It’s a super easy way to level up what can be a basic side – and it’s perfect for Christmas dinner.”

I think it’s fair to say I’ll be tucking into this treat throughout the year, too.

Share Button

This £12 Amazon Find Gave Me A Third More Usable Oven Space

We hope you love the products we recommend! All of them were independently selected by our editors. Just so you know, HuffPost UK may collect a share of sales or other compensation from the links on this page if you decide to shop from them. Oh, and FYI — prices are accurate and items in stock as of time of publication.

As Christmas draws near, I’ve been feeling the panic pretty much anyone who’s hosted a big dinner has experienced ― how am I meant to cook everything I need to when I’ve only got one oven?

Don’t get me wrong, I love my slow cooker (where I’m planning to make some spiced apple red cabbage on the day), and I’m not completely against steamed veggies.

But with Yorkies, stuffing, pigs in blankets, roast parsnips, spuds, and some kind of fowl in the mix, I genuinely started to lose sleep over how it was all going to come together.

That was, of course, before I spotted this £12 universal oven rack from Amazon, which instantly made all my fears look ridiculous.

It’s got adjustable arms that you can tighten or loosen with the bolts attached to both sides of the rack.

You don’t need any tools to tighten or loosen it ― a simple twist with your thumb and forefinger is more than enough.

It extends from 36cm to 59cm, making it perfect for most ovens (it only took about a minute to make it fit mine).

After I’d fitted it into my oven, my first step was to try a dry run of the Crimbo dinner (basically, I did a roast).

I’ll be honest; I was worried there wouldn’t be enough height in my oven to properly accommodate everything I wanted to include, but by placing the top and bottom racks at the highest and lowest ridges respectively, I got away with a lot more than I thought I would.

So it’s pretty safe to say I’m sold on the addition ― you can nab your own here, if you like.

Share Button

I’ve Tried Over 30 Brownie Recipes ― The Best Ones All Omit This Common Ingredient

Some people treat fudgy vs cakey brownie discourse like it’s a debate. It’s not; the latter is a chocolate traybake, and the former is a proper, you know, brownie.

After all, no less than the Cambridge Dictionary defines them as “a small, square chocolate cake that is soft in the middle.”

With that understanding, I’ve long been on the hunt for the fudgiest, densest, most chocolate-y of chocolate brownie recipes.

I’ve tried Gordon Ramsay’s (fine, but not quite the right texture), Nigella Lawson’s (delicious but, again, not as relentlessly squidgy as I prefer), and even Mary Berry’s (dare I say it; they were a little lacklustre too).

Only a few recipes stood up to my gooey-base, paper-thin crispy top standards; and all of them had a counterintuitive secret in common.

Which is?

It sounds completely wrong, but the densest, fudgy-est brownies I’ve made have never featured melted chocolate in the batter.

Part of the reason why that feels so untrue is that melted chocolate is so luxurious, so extravagant, and so, well, chocolate-y. Why would something so cocoa-lly good make a chocolate dessert less sumptuous?

All I can say is it turns out Bon Appetit found the same thing I did when testing brownie recipes: “As compared to those made with just chocolate or a combination of the two, cocoa brownies are reliably superior in terms of texture and flavour,” they shared.

That’s partly because chocolate contains a fat called cocoa butter, which is solid at room temperature (hence, you bite a chocolate bar rather than spread it on your toast).

But when you include cocoa powder, which contains next to none of the fat, your batter is forced to rely on the other fat in the mix for its texture ― butter.

Dairy butter is just about solid at room temperature, but much less so than its cocoa cousin.

That means brownies made without melted chocolate in the batter take on more of the properties of the butter; they’re softer, more velvet-y, and gooier when cold.

Then, there’s a question of taste; good cocoa is, well, 100% cocoa, while chocolate will always be somewhat tempered.

That leads to a darker, denser, more chocolate-y flavour.

So what’s the best recipe?

I do actually add some chocolate chunks (never chips) to the brownie mix after it’s all combined. Because it’s not incorporated into the batter, it doesn’t affect the brownie’s texture as much, and it tastes amazing.

But if you ask me, a person who has tried about 32 different variations, the best recipe around is from Hugh Fearnely-Whittingstall.

I have screenshotted, sent, and then saved his steps on multiple email accounts and written them out physically in more than two notebooks in case The Guardian ever take the page down.

“For me, brownie nirvana is a crackled, shiny top beneath which lies a rich, dense and chewy middle, verging on the underdone,” the food pro wrote ― and he delivered.

The only note I have is to skip the walnuts he suggests as an optional add-in in place of chocolate chips. Come on ― we all know why we’re really here.

Share Button

This Is The Simple Reason Why Sourdough Bread Is Much Healthier

If you’ve ever gone through a breadmaking phase, you’ve likely dabbled in creating your own sourdough using either a starter of your own or one given to you.

However, if you weren’t familiar, BBC Good Food has a pretty explanation of what it is: “Sourdough is naturally leavened bread, which means it doesn’t use commercial yeast to rise. Instead, it uses a ‘starter’ – a fermented flour and water mixture that contains wild yeast and good bacteria – to rise.

“This also produces the tangy flavour and slightly chewy texture you’ll find in sourdough.”

It’s also delicious. Perfect for sandwiches, toasting, dipping in soup, on the side of salads… you name it, sourdough is the perfect accompaniment.

However, the hidden benefit of sourdough isn’t its taste or how easy it is to create. It turns out that sourdough is actually very good for your health, too.

The health benefits of sourdough

According to Web MD, sourdough is rich in nutrients that make the bread overall good for our bodies, disease prevention and lowering blood sugar.

However, it’s our gut health that sees the most benefits, especially in comparison with other breads.

The health experts said: “Sourdough bread may be easier to digest than white bread for some people.

“According to some studies, sourdough bread acts as a prebiotic, which means that the fibre in the bread helps feed the “good” bacteria in your intestines. These bacteria are important for maintaining a stable, healthy digestive system.”

How to make a sourdough starter

If you want to try your hand at making sourdough, you’ll first need to make a starter.

For a starter, according to Jamie Oliver, you’ll need 100g strong white bread flour, 100g dark rye flour, 200ml of water and a container that can be sealed — around 1L is ideal.

View Jamie’s recipe full here, and good luck!

Share Button

Do This 1 Trick Immediately After Using A Sieve To Prevent Stuck-On Food

Ah, sieves ― they’d be such a handy tool if they weren’t nigh-on impossible to clean.

As someone who tends to be much kinder to “current me” than I am for “future me,” – I still end up using mine about once a day.

It’s perfect for draining pasta (except for the washing). It’s a great way to ensure no lemon seeds end up in the juice (except for the washing). It’s useful for sifting flour, too, except… well, you get the message.

So you can only imagine how relieved I was to find that taking one simple step immediately after using the tool can prevent an awful lot of stuck-on food.

Which is?

Food magazine Bon Appétit wrote that whacking the utensil against your sink as soon after using it as possible is really, really helpful.

“As soon as you finish using your sieve, bang it against the sink,” they shared.

“This helps dislodge some of those smaller pieces that haven’t had time to mush up and settle in.”

They add that you should also soak your sieve in very hot, soapy water for 15 minutes “right away.”

A dash of distilled white vinegar added to the mix can make cleaning it even more effective, the publication says.

However, for both methods, speed is key.

Is that the only hack?

Far from it. In a Reddit thread about the cooking conundrum, site users were full of recommendations.

“I turn it upside down in the sink, and use the sprayer to blast the back side. This usually cleans it pretty well,” one Redditor wrote.

Many advised against letting your sieve rest after use, even for a minute ― more people than I’d expected knew about the “banging it against the sink” trick too (am I the only one this is news to?).

Yet another person suggested using a toothbrush if the debris gets really dire (Bon Appétit reccomends this too).

With all the resentment I’ve built up to that accursed mesh, hitting it against the sink should be easy…

Share Button

Here’s Why You Should Never Use Oil Alone When Frying Eggs

If you’ve ever tried to fry an egg in a nonstick pan, you’ll know how tricky the supposedly easy protein can be to cook.

It’s not just ensuring the whites don’t rip off in a jagged, uneven strip, or preventing the yolk from splitting; there’s also the struggle of getting that lacy, crunchy base and runny yolk without keeping any slimy, uncooked whites.

There’s lots of advice for those looking. For instance, “hot pan, cold oil” has proven a consistent way for me to achieve unstuck eggs every time; I’ve found that using room-temperature eggs is also a helpful tidbit.

But there’s only one egg trick I use every time I fry one; you should be using water as well as oil in the process.

Why should I use water as well as oil when frying an egg?

Once you’ve got the bottom of your egg cooked, water is essential to steam its top. This keeps the egg runny and the whites firm.

As Food & Wine’s culinary director, Justin Chapple, explained, “You start by adding a small amount of oil to the skillet and cracking in the eggs, just like you normally would.”

“Then, about 30 seconds in, you add hot water to the pan, basting the eggs until the whites are set and the yolks are still runny. It creates tender, soft fried eggs with no overdone edges in sight.”

Not only does this prevent rubbery or runny eggs, but it also cooks them more evenly than just oil ― so you won’t have to flip them (just be careful to keep everything on a medium heat to prevent evaporation).

In case you thought we were alone, none other than Best Recipes Australia swears by the hack for “that perfect, gooey yolk” (I’m drooling).

Of course, basting the egg with hot oil can have a similar result ― but even when chefs like Gordon Ramsay use fats only, they ensure it’s not just oil.

Gordon revealed in a video on the topic that he only uses a “tiny drop” of oil followed by a heartier “knob” of butter, which has a lower smoke point and can be used to banish that “raw egg white” that “can be uncomfortable.”

Any other fried egg hacks?

If you’re really willing to go out of the box, food blogger and cookbook author Lisa Steelewrote for her account Fresh Eggs Daily that you can fry your eggs in cream.

When you think about it, it’s kind of the same philosophy as using butter (which none other than Gordon Ramsay swears by for the job).

She places a thin layer of heavy cream at the base of a cold pan, heats it on medium until it’s bubbling, then adds the eggs.

“The cream will continue to bubble and eventually begin to separate and then caramelize as the eggs cook,” the caption of her Instagram post reads.

Having seen the results in her video, I’m tempted to give it a go (for journalism, of course).

Share Button